| Source:- Google.com.pk |
125g/4.4 oz plain/all-purpose flour 4 teaspoons freshly squeezed lemon or orange juiceSoft icing 100g/3.5 oz softened butter 2 tablespoons warm water 380g/13.4 oz icing ugar/confectioners sugar
For decorations: Pink dragées or cachous and small fondant flowers, optional but desirable
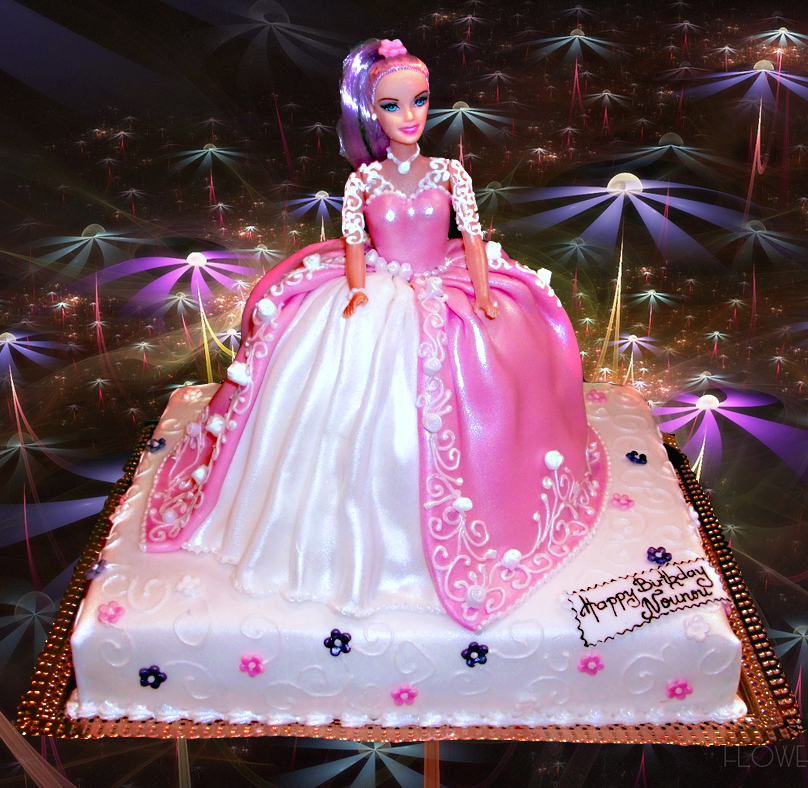
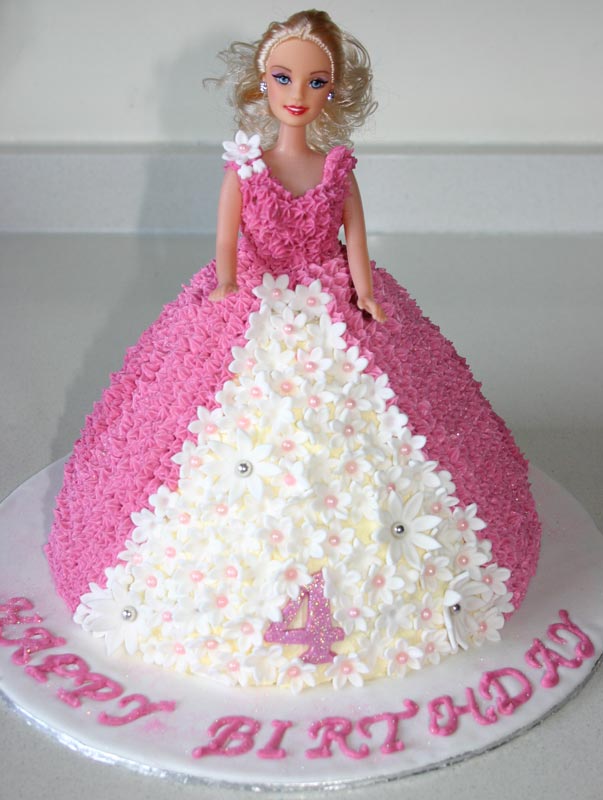
Butterfly Barbie Cake 340g/12 oz package butter cake mix Icing (see recipe above) and pink food coloring For decorations: Candies, including fruit leather roll or wrap if possible and fondant in various colors Method 1 of 2: Real Barbie Doll Cake Baking the Cake 1Make sure the doll and her accessories are clean and spotless. Sponge clean the doll with mild dish washing detergent and, if necessary, wash the washable accessories in warm, soapy water. Let dry before using. If her clothing is dirty, wash by hand and let dry before using. Brush the doll's hair before using the doll; this will avoid getting hair mixed up with the food ingredients. It can help to pull it back while working the doll into the cake, then remove the elastic after.2Preheat the oven to 180ºC/350ºF. Grease and line the cone cake pan with parchment paper.3If making the cake from scratch, make as follows using the ingredients listed above:Cream the butter and sugar together. Make the mixture light and fluffy.Crack each egg and add one at a time. Beat well.Sift the flours together. Fold into the mixture and mix through.Fold in the lemon juice.4Pour the cake mixture into the lined cone cake pan. Place in the preheated oven and bake for 40 minutes, or until a skewer pierced into the cake comes out clean.For a package cake, follow the package instructions.Assembling the Cake
1Remove the cake from the oven when baked. Let cool completely before building the Barbie cake.2Prepare the Barbie doll first.Wrap the lower half of the Barbie doll in food grade plastic wrap. Cover everything that will be inserted inside the cake and pay particular attention to ensuring that her clothing is well covered from the waist down, to prevent staining from the food.Tape the waist end of the plastic wrap in place.3Make a hole inside the cake. Place the baked, cooled cake onto a cake board, large base of the cake sitting on the board. Then, using a sharp kitchen knife of a good length and narrow width, carve out a doll-size hole that is deep enough to take Barbie's legs up to her waist area.It can be helpful to measure Barbie's length before making the hole. You can then slip a ruler inside to gauge the the hole is deep enough before adding the doll into it. The less Barbie has to be stuck in and out of the cake, the better, as this will protect her from staining.
4When you're happy that the hole is ample enough, push Barbie into the hole. She should sit in the hole up to the taped waist, with the remainder of her body sitting well above the cake.Push her arms up into the air to allow you to work on the icing without obstruction.If you haven't already done so, tie her hair back temporarily with a quality hair elastic, to keep it out of the way while you ice the cake.Add any Barbie accessories after the icing has been added; the less things in the way, the better.Icing the Cake 1Make the icing. You'll need soft icing in two shades, pink and white. For the purposes of this tutorial, it's assumed that pink is the ultimate Barbie color but you don't have to choose pink if you don't want to––vary as needed. To make the icing: Beat together the butter and water until creamy.Add the icing sugar/confectioners sugar gradually.Mix to combine well.
Divide the mixture in a ratio of one third and two thirds. Add a few drops of red food coloring or pink food paste to the two thirds icing, to make pink icing. Leave the one third icing white.
If the icing seems to stiff at any point, add a drop or two more water.2Ice the cake. Cover the entire cone cake with soft pink icing. Let set before adding the piping.3Add piping to the cake. This creates the fancy ballgown for Barbie.Pipe a row of white stars around the base of the cake.
Pipe a row of pink stars above the first white row.Repeat the rows in alternate colors until you reach Barbie's waist.Finish with a white row. Add a row of pink candies or dragées/cachous to form the waistline division between Barbie and her ballgown skirt.4If you like, add fondant flowers at regular intervals around Barbie's ballgown skirt. These can be made or purchased ready-made.5Add Barbie's accessories to her neck, head and hands as needed. Take the elastic out of her hair and gently let her hair down. Position her arms elegantly.6Done. The Barbie cake is now ready for your little Barbie fan's party.Method 2 of 2: Butterfly Barbie CakeFor this version of the cake, rather than standing up, Barbie is lying down on a butterfly cake, the wings becoming a part of her outfit. She can also be called a fairy Barbie if that's what your little Barbie fan prefers.1Prepare Barbie as for the previous cake. Remove all of her clothes this time, as she will be "dressed" in candy instead.Tie back Barbie's hair in pink ribbon. Make it as high a ponytail as you can, as it will look better on top of her head when she is lying down.Making the Cake1Make the cake. Follow the package mix instructions and bake the cake in a square cake pan lined with parchment paper.2Bake for 30 minutes or until a skewer inserted into the cake comes out clean.3Remove from the oven. Let stand in the pan for 10 minutes after removing from the oven.Place on a wire cooling rack and let cool completely before icing.4Trim the cake into wings. To do this, draw a butterfly wing template that matches the size of the cake on construction paper or thin card. Cut this out, then place over the square cake. Cut around the template and remove the excess outside pieces, leaving the butterfly shape intact.Basic butterfly wing shapes can be found by doing a quick online image search.If you make a sturdy enough template, it can be kept for using another time. Simply brush off crumbs or icing that accumulates over time.5Place the trimmed cake onto a cake board.Icing the Cake1Make the icing. Use the same recipe as above. However, there is no need to make two colors; this time simply use pink as the base color (or vary as needed).2Ice the cake with the pink icing. Cover all of the sides as well as the top.3Decorate the edges of the cake with candies of choice. Alternatively, cut out shapes from fondant and add these in a pattern around the edge of the cake.Adding the Barbie to the Cake1Wrap Barbie's chest with a stretchy candy or fruit leather roll. If you can't find something like this, be creative with any sort of candy that will cover Barbie up modestly. 2Place Barbie in the middle of the iced cake. Her head and neck should be located above the cake's middle dip and her legs should come out from the lower dip in the middle of the cake, just above her knees. The wings will fan out from either side of her body.Barbie should adhere to the existing icing already on the cake but if not, add a few more dabs of icing to help keep her in place.3Add rows of overlapping candies to her lower half to form a skirt. If you can find candies shaped like leaves or berries, this will fit the nature/fairy theme. Thick candies can be sliced in half to help them fit better and their sticky insides will make it easier to attach them.Use icing as the glue to keep the candies stuck to the doll and each other.4Pose Barbie's arms neatly. Her legs should be straight down. Once the icing sets, the cake is ready to serve.Are you an expert on algebra?
If so, share what you know about how to learn algebra.Please be as detailed as possible in your explanation. We will take your detailed information, edit it for clarity and accuracy, and incorporate it into an article that will help thousands of people.Tell us everything you know here. Remember, more detail is better.A spectacular alternative to the upright Barbie cake sitting on a cake board is to sit the completed upright Barbie cake, (thin) board and all, atop a large square or rectangular cake rather than just the cake sitting alone on a cake board. This may be most suitable where you have made a very large cake for many people and the single Barbie cake wouldn't be enough on her own.There are many variations on how to pipe Barbie's ballgown skirt. The one suggested here is a simple approach that works well. If you're more skilled than piping simple lines, do an image search to find the many possibilities for changing the icing style around. One effective alternative is to pipe an upside down "V" shape at the front of Barbie's ballgown skirt in one color and to complete the rest of the cake in another color. This gives the impression of an outer layer and an inner layer of her ballgown skirt.It is possible to buy flat edible Barbie images that are simply laid onto the finished and iced cake. This is another simple but very effective way to produce a Barbie cake for the time-pressured baker. Be careful about making Barbie cakes for commercial purposes. The Barbie logo, doll and styles are subject to copyright and you'll need to seek permission for anything that results in making a profit from the Barbie merchandise.These cakes are not suitable for freezing. Eat as quickly as you can!
Barbie Birthday Cake Birthday Cake Images For Girls Clip Art Pictures Pics With Name Ideas With Candles Love Designs

Barbie Birthday Cake Birthday Cake Images For Girls Clip Art Pictures Pics With Name Ideas With Candles Love Designs
Barbie Birthday Cake Birthday Cake Images For Girls Clip Art Pictures Pics With Name Ideas With Candles Love Designs

Barbie Birthday Cake Birthday Cake Images For Girls Clip Art Pictures Pics With Name Ideas With Candles Love Designs

Barbie Birthday Cake Birthday Cake Images For Girls Clip Art Pictures Pics With Name Ideas With Candles Love Designs

Barbie Birthday Cake Birthday Cake Images For Girls Clip Art Pictures Pics With Name Ideas With Candles Love Designs

Barbie Birthday Cake Birthday Cake Images For Girls Clip Art Pictures Pics With Name Ideas With Candles Love Designs
Barbie Birthday Cake Birthday Cake Images For Girls Clip Art Pictures Pics With Name Ideas With Candles Love Designs

Barbie Birthday Cake Birthday Cake Images For Girls Clip Art Pictures Pics With Name Ideas With Candles Love Designs
Barbie Birthday Cake Birthday Cake Images For Girls Clip Art Pictures Pics With Name Ideas With Candles Love Designs

Barbie Birthday Cake Birthday Cake Images For Girls Clip Art Pictures Pics With Name Ideas With Candles Love Designs
No comments:
Post a Comment